
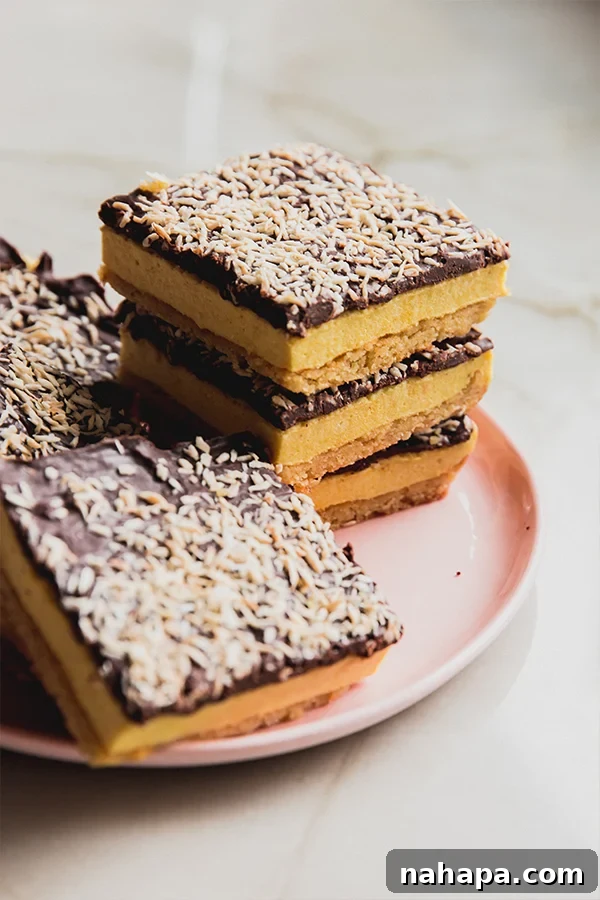
Step into summer with a truly sensational treat: our Lemon Coconut S’mores Bars! Imagine the classic campfire delight elevated to bakery-style perfection, offering a harmonious blend of zesty lemon, tropical toasted coconut, and the comforting sweetness of traditional s’mores. These bars aren’t just incredibly delicious; they’re also thoughtfully crafted to be gluten-free, grain-free, and dairy-free, made with wholesome, real food ingredients. Get ready to indulge in a dessert that’s both decadently satisfying and wonderfully refreshing for those warm sunny days.
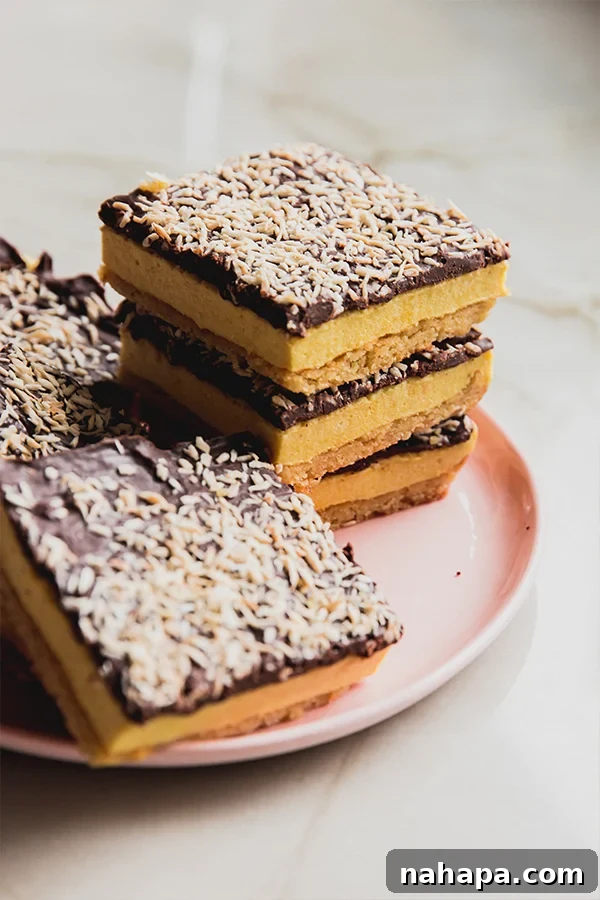
Lemon Coconut S’mores Bars: The Ultimate Gluten-Free & Dairy-Free Summer Dessert
Last year, our original s’mores bars recipe took social media by storm, captivating taste buds and becoming a beloved viral sensation. The overwhelming success inspired us to experiment with new variations, and one request echoed louder than all others: a desire for an even deeper, more complex toasted flavor. Given that s’mores are inherently about toasting marshmallows over an open flame, it felt like an obvious evolution. That’s when inspiration struck: why not infuse that quintessential toasted element with fragrant toasted coconut? This revelation paved the way for a brand new, irresistible creation. But we didn’t stop there.
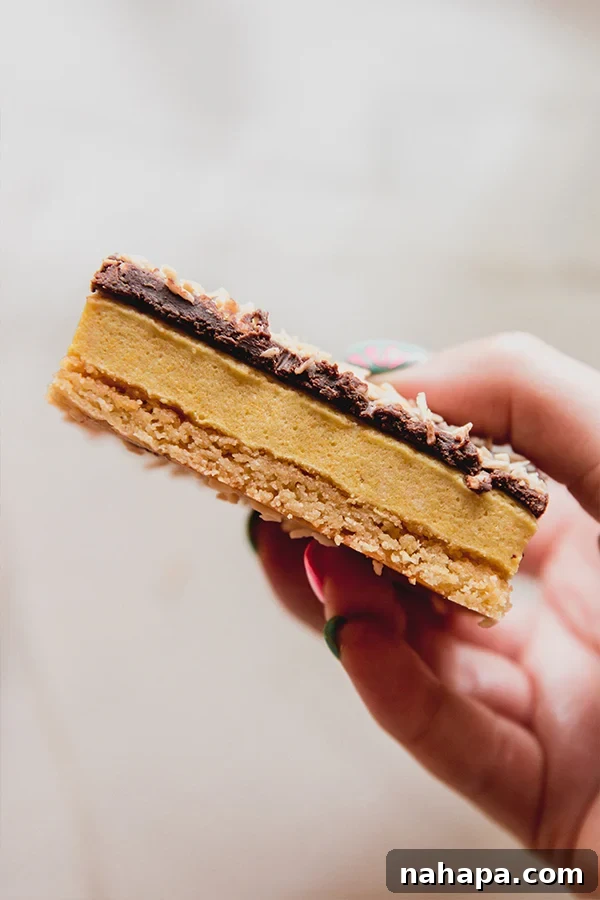
To truly elevate this summer treat, we introduced the bright, invigorating essence of lemon oil. The citrusy notes of lemon oil cut through the richness, creating a beautifully balanced flavor profile that pairs impeccably with the warm, nutty undertones of toasted coconut. This innovative combination respects the beloved classic s’mores elements while introducing a sophisticated, refreshing twist that makes these bars uniquely irresistible. Each bite delivers a symphony of textures and tastes: a crisp, crumbly crust, a pillowy, lemon-infused marshmallow, and a rich, dairy-free chocolate ganache, all crowned with perfectly toasted coconut flakes. These bars are not just a dessert; they’re a celebration of summer flavors, made accessible and enjoyable for everyone.
Why You’ll Fall in Love with These Lemon Coconut S’mores Bars
Prepare to add these Lemon Coconut S’mores Bars to your list of all-time favorite summer treats. They offer a unique blend of familiar comfort and exciting new flavors, all while catering to specific dietary needs. Here’s why you’ll absolutely adore them:
- Unforgettable Toasted Coconut Flavor: We heard your requests loud and clear! The addition of perfectly toasted coconut brings a new dimension of flavor, mimicking the beloved char of a campfire marshmallow while adding a tropical, nutty depth. It’s a game-changer for s’mores enthusiasts looking for that authentic, slightly smoky sweetness.
- A Zesty Lemon Twist: The vibrant, fresh taste of lemon oil is the perfect counterpoint to the sweetness of the s’mores layers. It brightens every bite, making these bars feel lighter and more refreshing, especially ideal for warmer weather. This lemony zing transforms a classic into an unexpectedly sophisticated dessert.
- Dietary Friendly & Wholesome: Crafted with real food ingredients, these bars are proudly gluten-free, grain-free, and dairy-free. This means more people can enjoy this decadent treat without compromise, making them a fantastic option for gatherings where dietary preferences might vary.
- Bakery-Style Indulgence at Home: Achieve professional-looking and tasting results right in your own kitchen. These bars offer multiple layers of deliciousness that are impressive to serve yet surprisingly straightforward to make, giving you that gourmet bakery experience without leaving home.
- The Perfect Summer Dessert: Light, refreshing, and deeply satisfying, these bars are designed for summer. Whether it’s a backyard BBQ, a picnic, or simply an evening treat, their bright flavors and cool, layered texture make them an ideal choice for any warm-weather occasion.
The Secret Behind the Flavor: Key Ingredients Explained
Every layer of these Lemon Coconut S’mores Bars is carefully crafted with specific ingredients that contribute to their incredible taste and texture. Understanding each component helps ensure your baking success and appreciate the thoughtful balance of flavors.
For the Irresistible Graham Cracker Crust:
The foundation of any great s’mores bar is a sturdy, flavorful crust. Ours is designed to be both gluten-free and delicious, providing that essential “graham cracker” crunch.
- Almond Flour: As the primary flour, almond flour provides a wonderful nutty flavor and a delicate, tender crumb that’s naturally gluten-free and grain-free. It’s crucial for the crust’s texture and richness.
- Arrowroot Starch: This acts as a binding agent, helping to hold the crust together while giving it a crispier, more stable structure. It’s a fantastic gluten-free alternative to cornstarch.
- Maple Syrup: Our natural sweetener, maple syrup, not only adds a rich, caramel-like sweetness but also helps bind the crust ingredients, contributing to its moist yet firm consistency.
- Ghee, melted (sub coconut oil): Ghee, clarified butter, provides a rich, buttery flavor without the dairy solids, making it dairy-free. If you need a strict vegan option or prefer a coconut flavor boost, melted coconut oil works perfectly as a substitute, adding moisture and helping the crust set.
- Vanilla Extract & Cinnamon: These two ingredients are non-negotiable for that authentic “graham cracker” taste. Vanilla adds warmth and depth, while cinnamon provides a spicy, aromatic note that is classic in s’mores.
For the Fluffy Lemon Marshmallow Layer:
This vibrant, airy layer is what truly sets these s’mores bars apart, offering a homemade marshmallow experience infused with bright citrus.
- Lemon Oil: This is key for achieving an intense, pure lemon flavor without adding excess liquid that could compromise the marshmallow’s texture. Lemon oil is significantly more concentrated than lemon juice, ensuring a potent burst of citrus.
- Turmeric, optional, for color: While entirely optional, a touch of turmeric provides a beautiful, natural yellow hue, enhancing the visual appeal of the lemon marshmallow without affecting its taste. It’s a simple way to make your bars pop.
- Water, Gelatin, and Honey: These are the foundational ingredients for our homemade marshmallow. Gelatin is the setting agent, creating that characteristic bouncy, chewy texture. Honey provides natural sweetness and, when heated to the correct temperature, creates the essential syrup base that whips into fluffy marshmallow.
For the Decadent Topping & Toasted Coconut:
The final layer brings together rich chocolate and fragrant toasted coconut, completing the s’mores experience with a tropical flourish.
- Shredded Coconut: Toasting the shredded coconut is a critical step that unlocks its deep, nutty flavor and adds a delightful textural crunch. It delivers on the “toasted” request, perfectly complementing the lemon.
- Dairy-Free Chocolate Chips: These form the base of our rich ganache, providing a smooth, melt-in-your-mouth chocolate layer. Opt for good quality dairy-free chocolate chips for the best flavor.
- Coconut Cream: The thick, rich part of canned full-fat coconut milk, coconut cream is essential for creating a luscious, velvety ganache. It provides a dairy-free creamy base that blends seamlessly with the melted chocolate.
How to Craft Your Lemon Coconut S’mores Bars: A Step-by-Step Guide
Making these Lemon Coconut S’mores Bars is a delightful process, building layers of flavor and texture. Follow these detailed steps to ensure perfectly indulgent results every time.
- Step 1: Preparing the Graham Cracker Crust. Begin by preheating your oven to 350°F (175°C). Line an 8×8-inch baking dish with parchment paper, extending the paper up the sides to create “handles,” and lightly grease it. In a large mixing bowl, combine the almond flour, arrowroot starch, maple syrup, melted ghee (or coconut oil), vanilla extract, and cinnamon. Stir vigorously until all ingredients are thoroughly incorporated and the mixture forms a cohesive, slightly wet and sticky dough. Press this mixture evenly into the bottom of your prepared baking dish, ensuring a compact and uniform layer. Bake for 18-20 minutes, or until the edges are lightly golden brown and the crust is fragrant. Once baked, remove from the oven and set aside to cool completely while you prepare the marshmallow layer.
- Step 2: Crafting the Lemon Marshmallow Layer. In a small bowl, pour ½ cup of water and sprinkle the gelatin evenly over the surface. Stir gently with a fork to ensure the gelatin is fully hydrated and combined with the water, then set it aside to bloom for about 5-10 minutes. Meanwhile, in a medium-sized, heavy-bottomed pot, combine the honey with the remaining ½ cup of water. Place the pot over low heat and slowly bring the mixture to a temperature of 235-240°F (113-116°C). This is a crucial step for marshmallow setting, so a candy thermometer is highly recommended. As soon as the mixture reaches the target temperature, remove it immediately from the heat. Carefully pour the hot honey mixture into the gelatin mixture. Using an electric hand mixer or a stand mixer with a whisk attachment, begin whisking on high speed. Continue to whisk for 10-15 minutes, or until the mixture becomes thick, opaque, white, and stiff peaks begin to form. At the very end of whisking, incorporate 1 teaspoon of lemon oil and the optional ¼ teaspoon of turmeric for color. Whisk for just a few more seconds to evenly distribute the flavors and color. Taste the marshmallow and add additional lemon oil if you desire a stronger citrus flavor, or more turmeric for a richer yellow hue. Pour this fluffy lemon marshmallow mixture directly over the cooled graham cracker crust in the baking dish. Gently spread it evenly and transfer the dish to the refrigerator for 3-4 hours, or until the marshmallow is firm yet soft and springy to the touch.
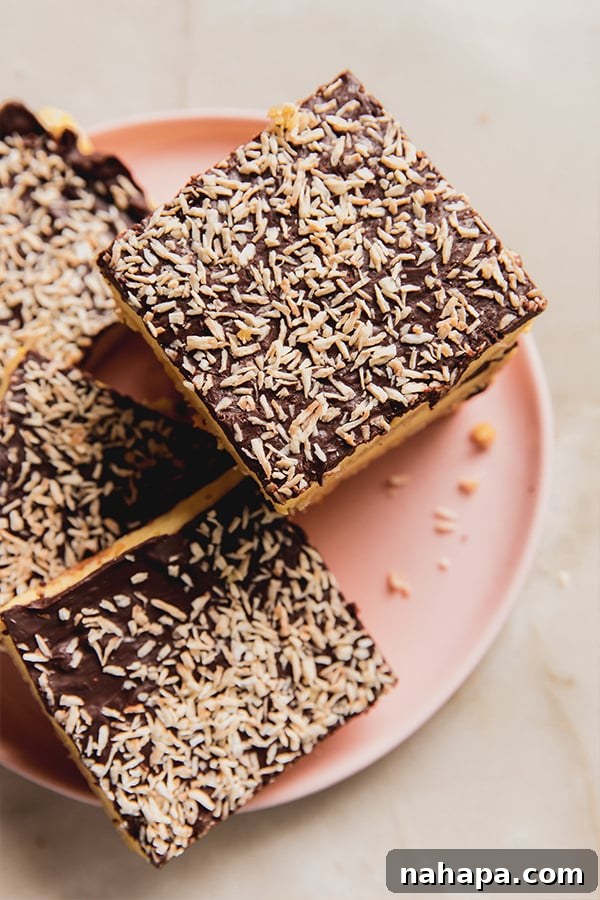
- Step 3: Creating the Toasted Coconut & Chocolate Ganache Topping. While the marshmallow sets, prepare your toasted coconut. Preheat your oven to 325°F (160°C). Spread the shredded coconut in a single layer on a parchment paper-lined baking sheet. Bake for 4-8 minutes, keeping a very close eye on it, as coconut can burn quickly. Stir every 2 minutes until it reaches a beautiful, lightly golden brown and becomes fragrant. Remove from the oven and let it cool completely. For the ganache, combine the dairy-free chocolate chips and coconut cream in a heatproof bowl. Melt them either in the microwave in 20-second intervals, stirring well after each interval until smooth, or over a double boiler. Once melted and smooth, allow the ganache to cool slightly to a warm, pourable consistency (it should not be steaming hot, as excessive heat can melt the marshmallow layer). Carefully pour the cooled ganache over the set marshmallow layer. Use a rubber spatula to gently spread the chocolate evenly across the entire surface. Immediately sprinkle the toasted coconut generously over the chocolate ganache.
- Step 4: Assembling and Chilling Your S’mores Bars. Once the ganache and toasted coconut are applied, return the baking dish to the refrigerator. Allow it to chill for an additional 1-2 hours, or until the chocolate ganache has completely set and is firm to the touch. This crucial chilling time ensures that all the layers are well-set and easy to cut.
- Step 5: Slicing and Serving. When the bars are fully chilled and firm, carefully remove the baking dish from the refrigerator. Using the parchment paper handles, lift the entire slab of bars onto a clean cutting board. For clean cuts, use a sharp knife that has been warmed under hot water and wiped dry, cleaning the blade between each slice. Cut the slab into 9 large squares, or for smaller portions, cut into 18 smaller rectangular slices. Serve these delightful Lemon Coconut S’mores Bars chilled for the best texture and flavor. Enjoy!
Expert Tips & Tricks for S’mores Bar Perfection
Achieving bakery-quality Lemon Coconut S’mores Bars at home is easier than you think with these expert tips and tricks. Pay attention to these details for the best possible outcome.
- The Importance of a Candy Thermometer: For the marshmallow layer, a candy thermometer is absolutely indispensable. Getting the honey mixture to precisely 235-240°F (113-116°C) is critical for the gelatin to properly activate and create that perfect fluffy, set marshmallow texture. Eyeballing the temperature can lead to a marshmallow that’s too soft or too hard.
- Flavor Adjustment to Your Taste: The recipe suggests 1-2 teaspoons of lemon oil. Start with 1 teaspoon, then taste the marshmallow mixture after it’s fully whisked. If you desire a more pronounced lemon zing, add the second teaspoon. Similarly, adjust turmeric based on your preferred color intensity; a little goes a long way.
- Patience is Key for Setting: Do not rush the chilling process for any of the layers. Allowing ample time in the refrigerator (especially for the marshmallow, 3-4 hours) ensures each layer sets properly, preventing a messy outcome and making for clean, beautiful slices.
- Toasting Coconut Perfectly: Keep a very close watch on the shredded coconut while it’s toasting in the oven. Coconut can go from perfectly golden to burnt in a matter of seconds. Stir it frequently and remove it as soon as it achieves a light, even golden color and a fragrant aroma.
- Achieving Clean Slices: For crisp, attractive slices, use a long, sharp knife. For even cleaner cuts, run your knife under hot water for a few seconds, wipe it dry, and then make your cut. Clean the blade again after each slice to prevent sticking and maintain sharp edges.
- Quality of Ingredients Matters: Since these bars rely on natural flavors, the quality of your ingredients makes a difference. Use good quality lemon oil for the best citrus flavor, and high-quality dairy-free chocolate chips for a superior ganache.
Storage & Shelf Life: Keeping Your S’mores Bars Fresh
To maintain the delightful texture and prevent any melting or structural issues, these Lemon Coconut S’mores Bars are best stored in the refrigerator. Place them in an airtight container to keep them fresh. While they are undoubtedly at their peak deliciousness within the first 24-48 hours, you can comfortably keep them refrigerated for up to 3-4 days. After this time, the marshmallow might begin to lose some of its optimal texture. Freezing is generally not recommended as it can alter the consistency of the marshmallow and ganache upon thawing.
Frequently Asked Questions About Lemon Coconut S’mores Bars
Here are answers to some common questions you might have about making and enjoying these unique s’mores bars:
- Can I use lemon juice instead of lemon oil? While fresh lemon juice adds great flavor, it’s generally not recommended for the marshmallow layer. Lemon juice is mostly water, and adding too much liquid can prevent the marshmallow from setting properly or make it too moist. Lemon oil provides a concentrated flavor without altering the marshmallow’s delicate chemistry.
- Are these bars suitable for a Paleo diet? Yes, these bars are made with real food ingredients and are designed to be both gluten-free and grain-free, making them suitable for many following a Paleo lifestyle. They are also dairy-free, aligning with common Paleo guidelines.
- Can I make these ahead of time for a party? Absolutely! These bars are an excellent make-ahead dessert. You can prepare them a day or two in advance and store them in the refrigerator. This allows all the flavors to meld beautifully and ensures they are perfectly chilled and set for serving.
- What if my marshmallow doesn’t set properly? The most common reason for a marshmallow not setting is incorrect temperature during the honey syrup stage. Ensure you use a reliable candy thermometer and remove the syrup immediately once it reaches 235-240°F (113-116°C). Inconsistent whisking or not enough whisking time can also be a factor. Keep whisking on high speed until stiff peaks form.
More Indulgent S’mores Creations from Unbound Wellness
If you’ve loved these Lemon Coconut S’mores Bars, be sure to explore more delicious and wholesome s’mores-inspired recipes from Unbound Wellness. We believe in enjoying your favorite treats, adapted to fit a real food lifestyle!
- Gluten Free S’mores Brownies
- S’mores Fudge
- S’mores Pizza
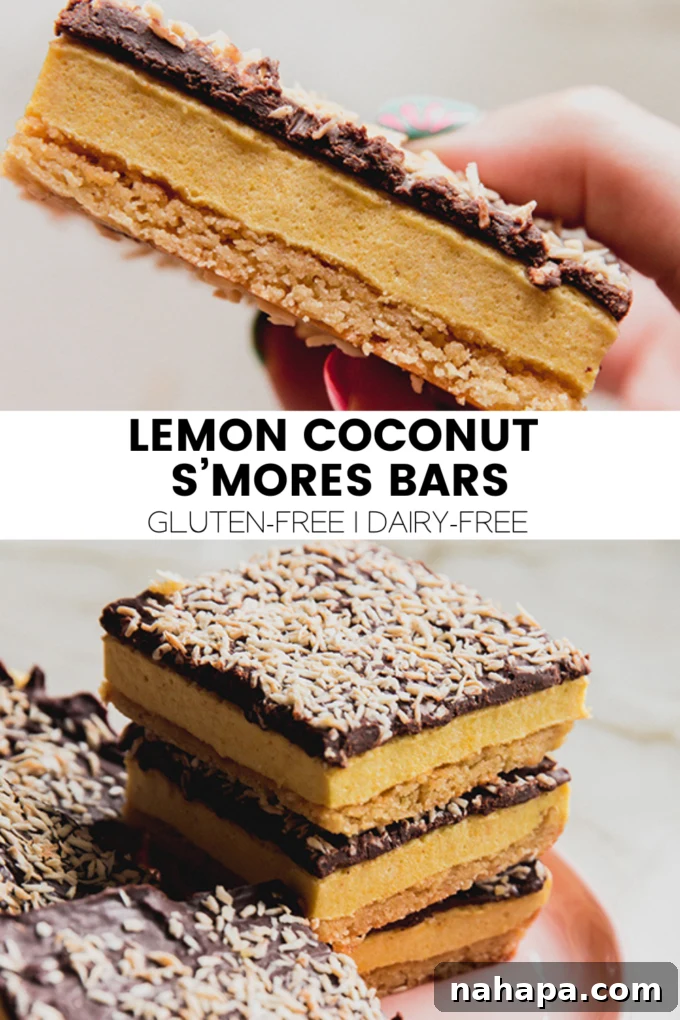
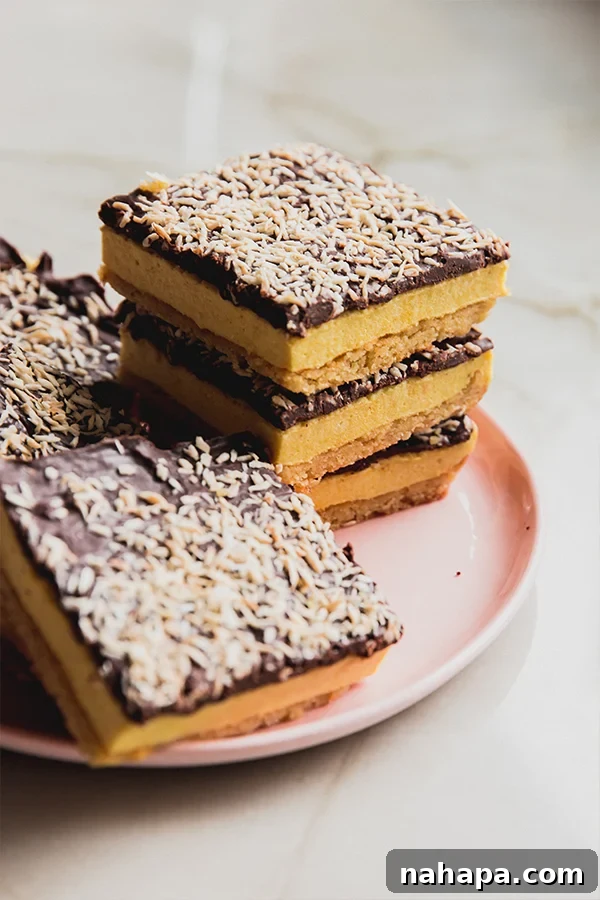
Lemon Coconut S’mores Bars (Gluten Free)
Author: Unbound Wellness
Leave a Review
Pin Recipe
Ingredients
For the Graham Cracker Crust
- 1 cup almond flour
- 2 tbsp arrowroot starch
- ¼ cup maple syrup
- ¼ cup ghee, melted (sub coconut oil)
- ½ tsp vanilla extract
- 1 tsp cinnamon
For the Marshmallow Layer
- 1 cup water, divided
- 3 tbsp gelatin
- 1 cup honey
- 1-2 tsp lemon oil
- ¼ tsp turmeric, optional, for color
For the Topping Ganache
- ⅓ cup shredded coconut
- 1 cup dairy-free chocolate chips
- ¼ cup coconut cream
Instructions
- To Make the Graham Cracker Crust:
- Preheat the oven to 350 F (175 C) and line an 8×8″ baking dish with lightly greased parchment paper.
- Combine the ingredients for the crust in a large bowl and stir until fully incorporated. The batter should be fairly wet and sticky.
- Press the batter into the baking dish until it evenly covers the bottom. Transfer to the oven and bake for 18-20 minutes, or until lightly golden brown.
- Remove the pan from the oven and set aside, allowing the crust and the pan to cool to the touch.
- For the Marshmallow Layer:
- Pour 1/2 cup of water into a small bowl and sprinkle the gelatin over top. Stir gently to ensure the gelatin is combined. Set aside.
- Using a medium-sized pot, slowly heat the honey combined with the other 1/2 cup of water. Slowly bring the temperature to 235-240 F (113-116 C) degrees on low heat. Remove from heat immediately once the mixture comes to temperature.
- Slowly add the hot honey mixture to the gelatin mixture as you whisk on high with either an electric hand mixer or a stand mixer. Continue whisking on high until stiff peaks start to form in the marshmallow mixture. At the end, add the turmeric for color (if desired) and 1 tsp of lemon oil. Whisk for just a couple of seconds to combine. Taste the marshmallow and add more lemon oil as desired or more turmeric for your desired color.
- Pour the mixture over the prepared crust and place in the fridge to harden for 3-4 hours or until soft and springy to the touch.
- For the Topping:
- Preheat the oven to 325 F (160 C) and line a baking sheet with parchment paper. Add the shredded coconut to the baking sheet and bake in the preheated oven for 4-8 minutes, checking often to ensure it doesn’t burn, until lightly toasted. Set aside.
- Combine the chocolate and coconut cream in a bowl and melt in the microwave in 20-second intervals, stirring each round, or over a double boiler.
- Allow the ganache to cool slightly (you don’t want it to be steaming or the marshmallow can melt) before pouring over the marshmallow. Use a rubber spatula to evenly spread the chocolate over the marshmallow. Sprinkle with the toasted coconut.
- Transfer to the fridge to allow to harden for 1-2 hours.
- Once the ganache is set, remove from the fridge and carefully transfer to a cutting board. Cut into 9 large slices, or 18 smaller slices, and serve chilled!
Notes
ALL NUTRITIONAL FACTS ARE ESTIMATIONS AND NOT EXACT.
Nutrition Facts
Serving: 1 serving, Calories: 446 kcal, Carbohydrates: 58.6g, Protein: 5.9g, Fat: 18g, Fiber: 2.7g
All nutrition facts are estimated and will vary.
Did you Make this Recipe?
Tag @unboundwellness on Instagram and hashtag #unboundwellness!