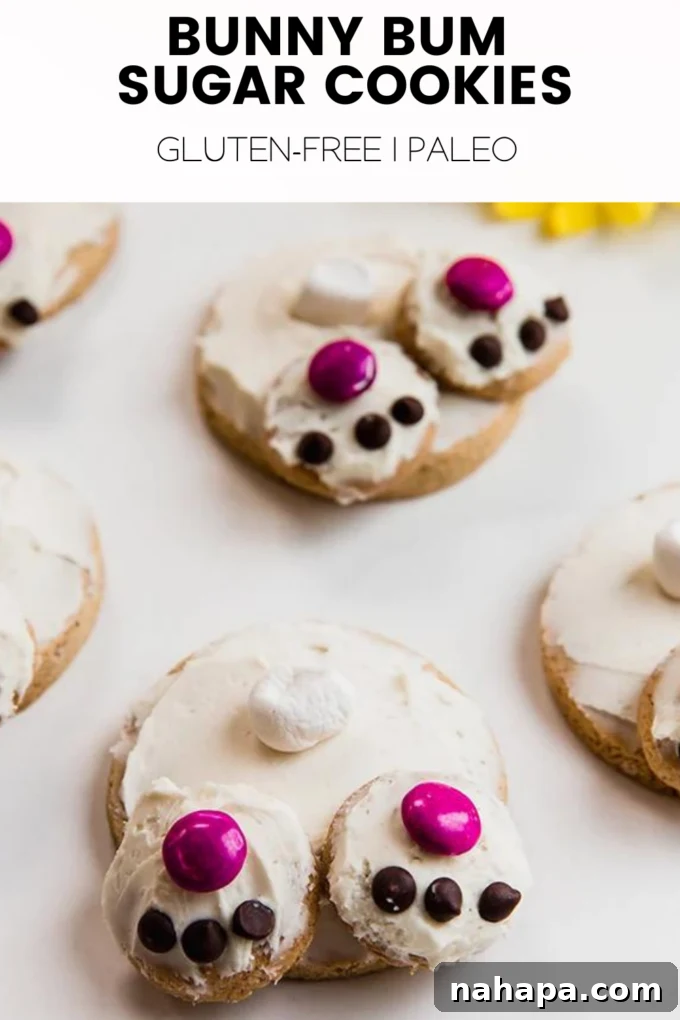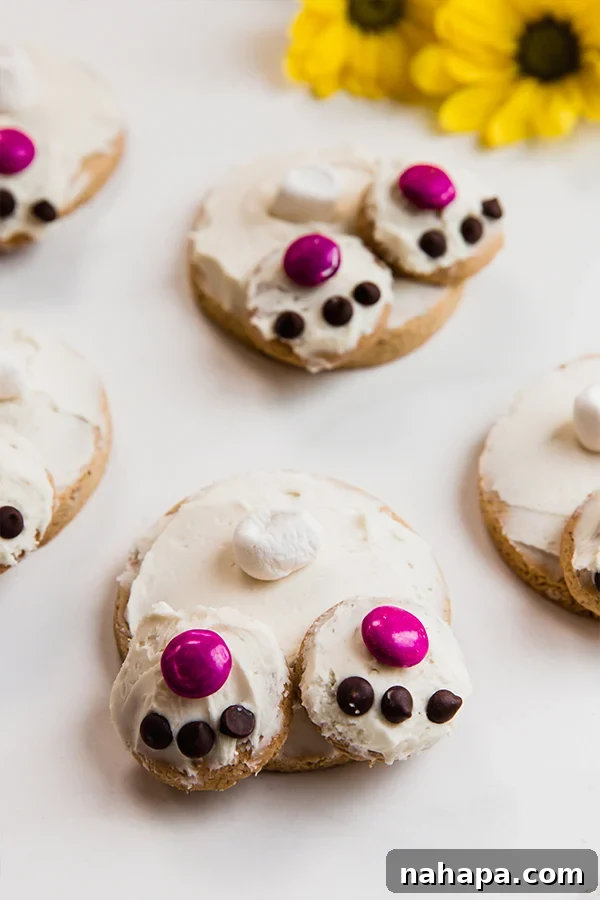
Easter is a time for joy, celebration, and, of course, delightful treats! Among the many festive desserts, nothing captures the whimsical spirit of the holiday quite like these adorable **Bunny Bum Sugar Cookies**. Imagine tiny, fluffy bunny tails peeking out from a field of sweet frosting – it’s a design that brings smiles to faces of all ages. What makes this recipe truly special is its commitment to inclusivity: it’s entirely **gluten-free**, deliciously **dairy-free**, and thoughtfully crafted to be easily modified for those following an **AIP (Autoimmune Protocol)** diet. So, whether you’re navigating food sensitivities or simply seeking a healthier twist on classic Easter baking, these charming cookies offer a guilt-free indulgence that doesn’t compromise on flavor or fun.
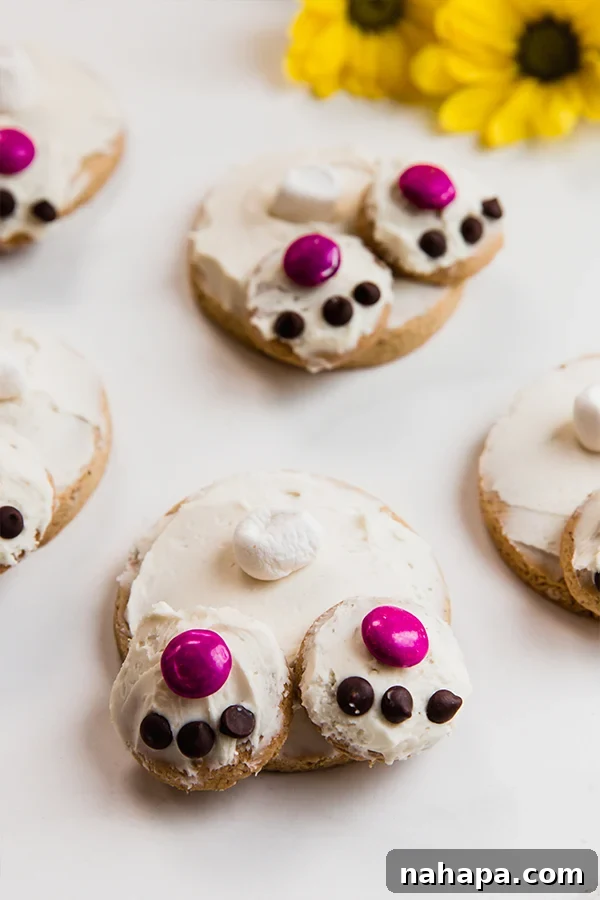
Transform your Easter dessert table into an enchanting display with these incredibly cute **bunny bum sugar cookies**! Far more than just a sweet treat, these cookies are a delightful craft project, perfect for engaging the whole family in holiday preparations. Each cookie is thoughtfully assembled with smooth, creamy icing, rich dairy-free chocolate chips, soft mini marshmallows for that iconic bunny tail, and vibrant Unreal candy gems to create the cutest little bunny feet. This combination results in a truly fun, unique, and memorable **Easter bunny treat** that everyone will adore.
Our carefully developed **gluten-free and dairy-free cookie recipe** forms the perfect foundation for these festive creations. Coupled with our easy-to-make frosting and innovative decorating ideas, you can confidently bake a batch of allergen-friendly cookies. The versatility of this recipe extends further, with clear guidelines provided to ensure it can be easily adapted to be **AIP-compliant**, making these delicious sugar cookies accessible to even more people with specific dietary needs. This commitment to both flavor and dietary accommodation makes these **healthy Easter treats** a standout addition to your spring celebrations.
Essential Ingredients for Your Gluten-Free Bunny Sugar Cookies
Crafting the perfect **allergy-friendly sugar cookies** begins with selecting the right ingredients. Each component in this recipe plays a crucial role in achieving the ideal texture, flavor, and dietary compliance. Here’s a detailed look at what you’ll need and why these choices matter for your delightful **bunny bum sugar cookies**.
Key Ingredients for the Cookie Dough:
- Tigernut Flour & Tapioca Starch: This unique blend of flours is at the heart of our **gluten-free cookie recipe**. Tigernut flour, a naturally sweet, nutrient-dense tuber, provides a wonderful texture and slightly nutty flavor without actual nuts, making these cookies **nut-free** as well. Tapioca starch, derived from cassava root, adds a delightful chewiness and helps bind the dough, ensuring your cookies hold their shape beautifully. We haven’t tested other flour combinations for these specific cookies, but if you’re looking for a common substitution, arrowroot starch can often be swapped for tapioca starch. For those seeking a significant shortcut without sacrificing quality, consider using the Holiday Cut Out Cookie Mix with Legit Bread Company, and simply follow the recipe instructions as usual. This mix is designed to simplify your baking process while maintaining the delicious, allergen-friendly qualities you expect.
- Gelatin Powder: An often-overlooked hero in gluten-free baking, gelatin powder acts as a fantastic binder and improver. It helps to create a more pliable dough, making it easier to roll and cut, and contributes to the cookies’ wonderfully soft, yet slightly firm, texture once baked. It’s especially beneficial in recipes without traditional gluten structures.
- Palm Shortening: This ingredient is vital for both the cookie base and the frosting. Palm shortening provides a stable fat source that results in a remarkably tender, almost cake-like texture for the cookies. Unlike butter, it’s completely dairy-free, ensuring the cookies remain suitable for those with lactose intolerance or dairy allergies. In the frosting, it creates a wonderfully smooth and creamy consistency that’s easy to spread and holds its shape.
- Maple Syrup: Moving away from refined white sugar, this recipe embraces the natural sweetness of pure maple syrup. Maple syrup not only lends a rich, complex flavor but also contributes to the cookies’ moistness. If preferred, honey can be used as an equally delicious and natural alternative, offering a slightly different but equally pleasant flavor profile.
- Vanilla Extract: A touch of pure vanilla extract enhances all the other flavors in the cookie, adding warmth and depth to every bite.
- Baking Soda: This leavening agent ensures your cookies have a slight lift and a tender crumb, preventing them from being too dense.
Essential Toppings for Decoration:
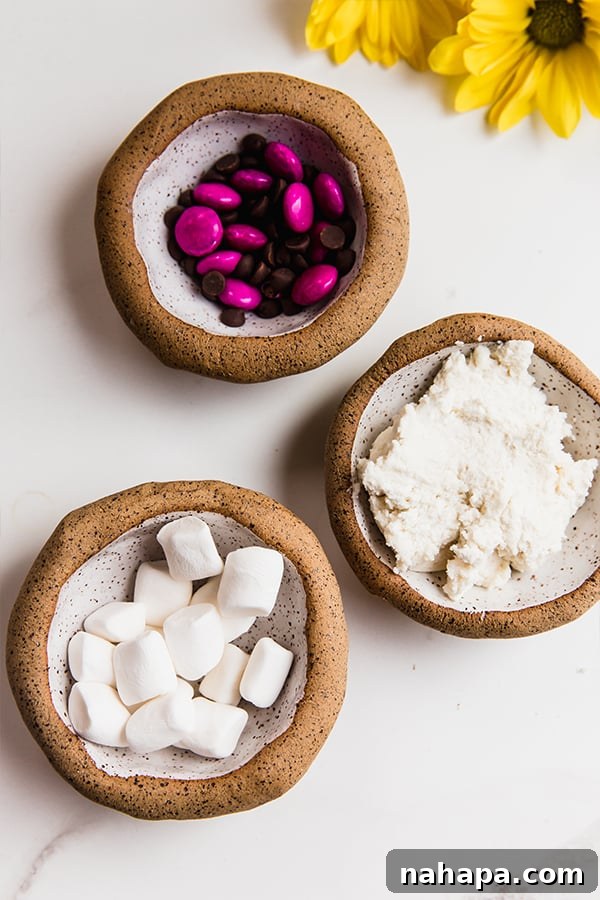
- Unreal Candy Gems: These colorful, dye-free candy gems are fantastic for adding a pop of color and texture without artificial ingredients. They’re a wonderful choice for creating the pink pads on the bunny feet, making the cookies visually appealing and fun to decorate.
- Dairy-Free Chocolate Chips: To form the tiny bunny toes, we recommend using mini dairy-free chocolate chips. Brands like Enjoy Life offer excellent options that melt beautifully and provide a rich chocolate flavor without any dairy. Their mini size is perfect for detailed decoration.
- Mini Marshmallows: The fluffy white tail is perhaps the most iconic part of these bunny bum cookies. Mini marshmallows provide the perfect texture and appearance for this charming detail, adding a soft, sweet touch.
For the Frosting:
- Homemade Frosting (Recipe Provided Below): Our dedicated frosting recipe uses palm shortening, light-colored honey, and arrowroot starch to create a silky-smooth, dairy-free frosting that’s perfect for decorating. It’s designed to complement the cookies without being overly sweet.
- Simple Mills Frosting (Optional): If you’re short on time or prefer a pre-made option, Simple Mills Vanilla Frosting is an excellent choice, provided it aligns with your dietary tolerances. Always check the ingredients to ensure it meets your specific needs.
By understanding the role of each ingredient, you’re not just baking; you’re crafting a mindful and delicious treat that respects various dietary preferences. These carefully selected components ensure your **Easter sugar cookies** are not only beautiful but also incredibly satisfying for everyone.
Essential Tools for Baking Perfect Bunny Bum Sugar Cookies
Having the right tools at hand can make the baking and decorating process smooth, enjoyable, and successful. While some items are essential, others offer convenience or allow for more precision in crafting your adorable **bunny bum sugar cookies**. Here’s a breakdown of the tools you’ll need:
- Cookie Cutters: For the signature bunny bum shape, you’ll need two round cookie cutters. One larger cutter will be used for the main body of the bunny, and a smaller one for the charming bunny feet. The key is to find cutters that are proportionate – typically, the smaller cutter should be about half the diameter of the larger one. If you don’t have specific cookie cutters, don’t worry! You can easily improvise: a standard drinking glass or mug works wonderfully for the larger cookies, and a teaspoon measure can serve as an excellent guide for cutting the smaller, round foot shapes. Just ensure the edges are clean for neat cuts.
- Baking Sheets: You’ll need at least one, preferably two, sturdy baking sheets to accommodate all your cookies. Lining them with parchment paper is crucial for preventing sticking and ensuring even baking.
- Parchment Paper: This non-stick surface is indispensable. Not only does it line your baking sheets for easy release, but it’s also ideal for rolling out your cookie dough. Rolling dough between two sheets of parchment paper prevents sticking and makes transferring cut cookies much simpler.
- Rolling Pin: Essential for flattening your dough to an even thickness of approximately 1/4 inch. An even thickness ensures consistent baking, preventing some cookies from being overcooked while others are still raw.
- Mixing Bowls: You’ll need at least two – one for combining dry ingredients and another for creaming wet ingredients.
- Whisk or Spatula: For mixing dry ingredients and for gently folding in wet ingredients to form the dough.
- Hand Mixer or Stand Mixer (Optional but Recommended): While not strictly necessary, an electric mixer makes creaming the palm shortening and maple syrup for both the cookies and frosting much easier and results in a lighter, fluffier texture.
- Cooling Rack: Essential for allowing your baked cookies to cool completely and evenly after coming out of the oven. This prevents condensation and keeps your cookies from becoming soggy.
- Small Spoons or Tweezers (for decorating): Useful for precisely placing the tiny chocolate chips and candy gems for the bunny toes and pads.
How to Make Your Adorable Bunny Bum Sugar Cookies
Creating these delightful **Easter sugar cookies** is a fun and rewarding process. Follow these detailed steps to ensure your cookies turn out perfectly, from dough to decoration.
Part 1: Preparing and Baking the Gluten-Free Cookies
- Preheat and Prepare Your Baking Sheet: Begin by preheating your oven to 350°F (175°C). Line a large baking sheet with parchment paper, then lightly grease it with coconut oil or another preferred fat. This step is crucial for preventing your delicate gluten-free cookies from sticking and ensures easy removal after baking. Set the prepared baking sheet aside.
- Combine Dry Ingredients: In a large mixing bowl, whisk together the tapioca starch, tigernut flour, gelatin powder, and baking soda. Ensure all ingredients are thoroughly combined and there are no lumps. This dry mixture forms the structural base of your cookies.
- Prepare Wet Ingredients: In a separate medium-sized bowl, use a hand mixer or whisk to cream together the palm shortening and maple syrup until the mixture is light and fluffy. This step incorporates air, contributing to the cookies’ tender texture.
- Combine and Form Dough: Gradually add the wet mixture to the dry ingredients. Stir in the vanilla extract. Mix until all ingredients are well combined and a cohesive, pliable dough forms. The dough should be soft but not sticky. If it feels too crumbly, you can add a tiny bit more maple syrup; if too sticky, a small sprinkle of tapioca starch.
- Roll Out the Dough: Transfer the dough to a clean pastry board or, for easier handling, between two sheets of parchment paper. Using a rolling pin, flatten the dough evenly to about 1/4 inch thick. This uniform thickness is key for consistent baking.
- Cut the Cookies: Take your larger round cookie cutter (or glass) and cut out 6 large circular cookies for the bunny bodies. Then, using your smaller cookie cutter (or teaspoon measure as a guide), cut out 12 smaller round cookies to create the bunny feet. Gently transfer the formed cookie dough shapes onto your prepared baking sheet, leaving a little space between each cookie to prevent them from merging during baking.
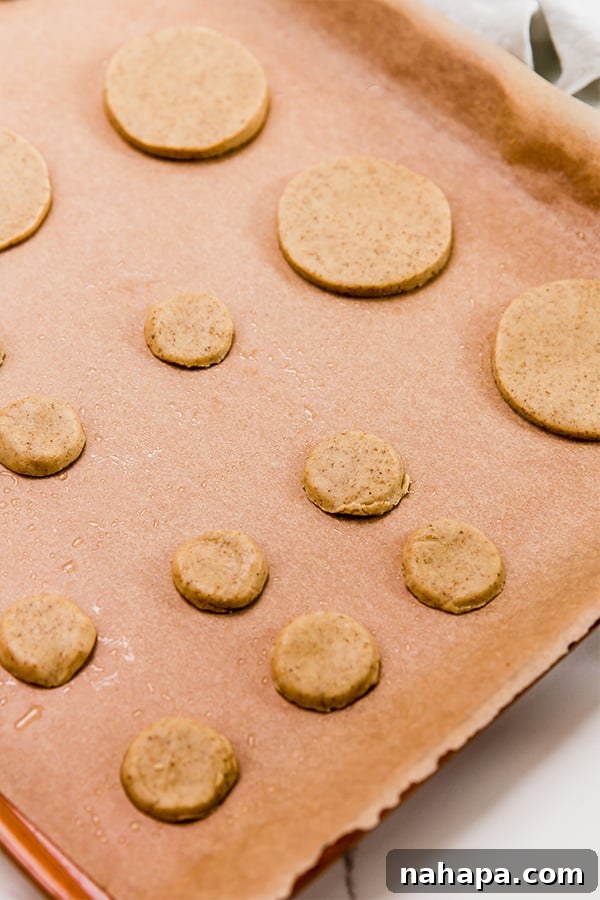
- Bake the Cookies: Place the baking sheet with the evenly spaced cookies into the preheated oven. Bake for 12-15 minutes, or until the edges of the cookies are lightly golden brown. Keep a close eye on them, as gluten-free cookies can brown quickly.
- Cool Completely: Once baked, carefully transfer the cookies from the baking sheet to a cooling rack. Allow them to cool completely before attempting to frost or decorate. This is vital, as warm cookies will melt your frosting and make decoration messy. Patience here ensures beautiful results!
Part 2: Preparing the Frosting & Decorating Your Bunny Bums
Once your cookies are perfectly baked and cooled, it’s time for the creative part! This is where the magic of the **bunny bum design** comes to life.
- Prepare the Frosting: In a mixing bowl, combine the palm shortening, light-colored honey, and arrowroot starch for your homemade frosting. Using an electric mixer, beat these ingredients together until they are thoroughly incorporated, smooth, and fluffy. If you’re using pre-made Simple Mills Frosting, simply prepare it according to package directions.
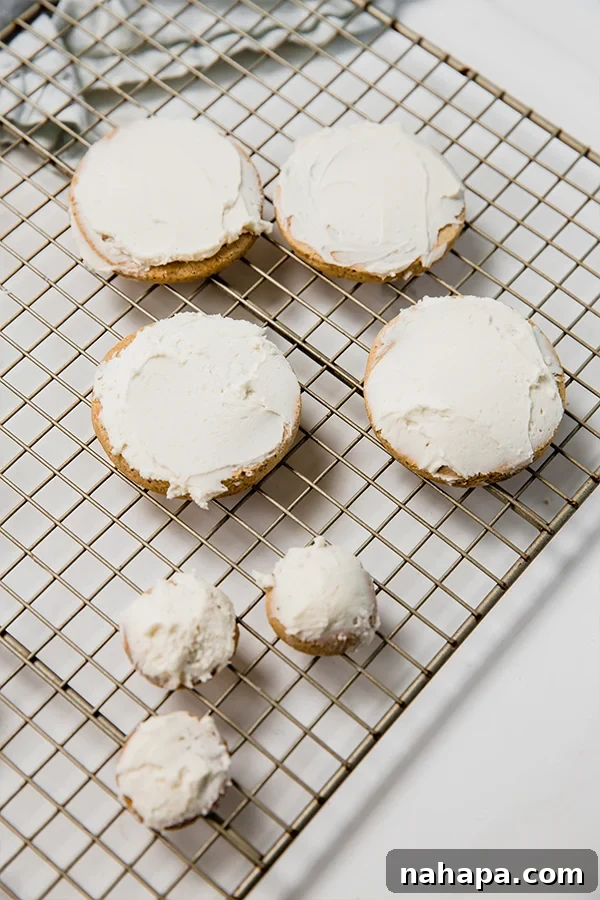
- Frost the Cookies: Using a knife or offset spatula, spread a thin, even layer of frosting over the top of each large round cookie. This layer will act as the “ground” for your bunny.
- Assemble the Bunny Feet: While the frosting is still fresh, gently press two of the smaller round cookies onto the bottom edge of each large frosted cookie. These will form the adorable bunny feet, sticking securely to the frosting.
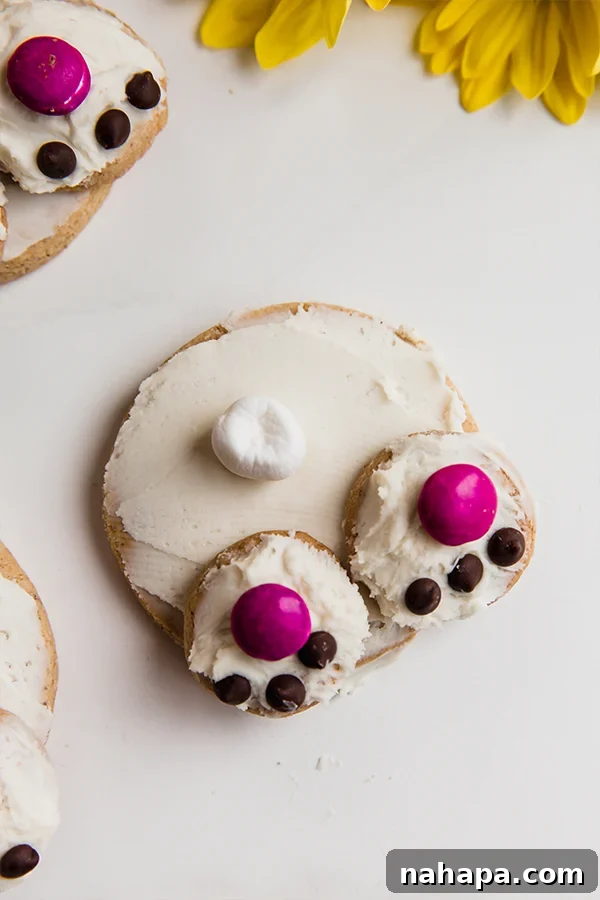
- Add the Bunny Tail: For the quintessential bunny tail, gently press one mini marshmallow into the center of each large cookie, slightly above where the feet are placed. This creates a soft, fluffy tail that brings the “bunny bum” to life.
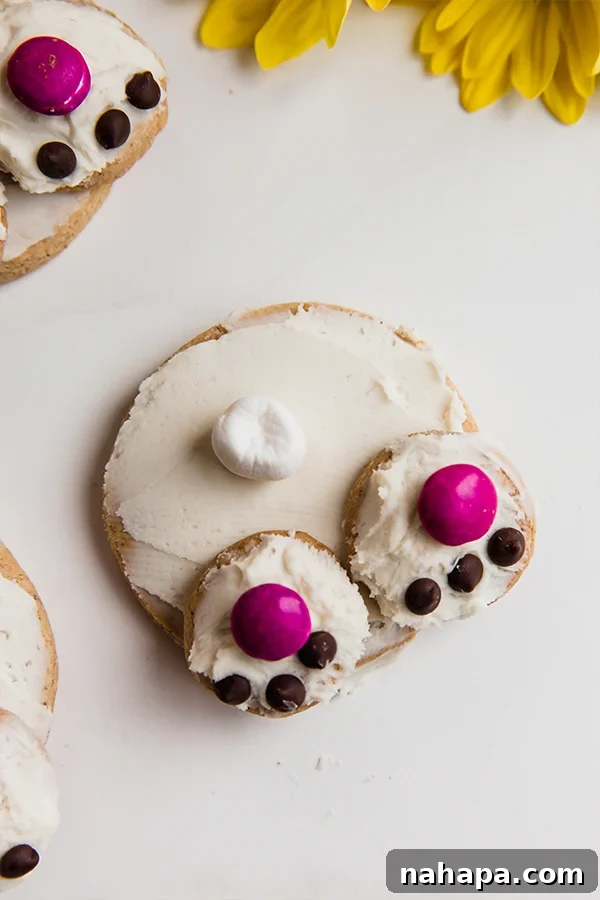
- Decorate the Feet (Toes and Pads): Now for the intricate details! On each smaller cookie (the bunny feet), place two pink Unreal candy gems in the center to represent the footpads. Then, below the candy gems, arrange three mini dairy-free chocolate chips in a triangular pattern to form the tiny bunny toes. Repeat this decoration process for all the cookies.
- Allow to Set: To ensure the frosting and decorations are firmly set, transfer the decorated cookies to the refrigerator for 10-20 minutes. Serving them chilled can also enhance the texture and flavor.
And there you have it – a batch of adorable, **gluten-free, dairy-free bunny bum sugar cookies** ready to bring joy to your Easter celebration! Enjoy the process and the delicious results.
Making This Recipe AIP (Autoimmune Protocol) Friendly
For those following the Autoimmune Protocol, enjoying festive treats can sometimes be a challenge. Thankfully, these **Easter sugar cookies** can be easily adapted to be fully AIP compliant without sacrificing any of their charm or deliciousness. Here are the specific modifications you’ll need to make:
- Use the Frosting Recipe As Written: The homemade frosting recipe provided in this article is already AIP-compliant, utilizing palm shortening, light-colored honey, and arrowroot starch. This ensures a delicious and safe frosting for your AIP cookies.
- AIP-Compliant Marshmallows for the Tail: Traditional marshmallows often contain corn syrup, gelatin not sourced from grass-fed animals, and sometimes other non-AIP ingredients. For an AIP-friendly bunny tail, use Sweet Apricity Marshmallows. These are specifically crafted with AIP-compliant ingredients and offer the perfect texture and appearance for your bunny tails.
- Freeze-Dried Fruit for Foot Decoration: Instead of Unreal Candy Gems and dairy-free chocolate chips (which may not be AIP-compliant due to cocoa or other ingredients), opt for freeze-dried fruit. Pink or red freeze-dried raspberries or strawberries, crushed or cut into small pieces, can be used to create the footpads and toes. This adds natural color and a lovely tangy note to the cookies while adhering strictly to AIP guidelines.
By implementing these simple substitutions, you can ensure your **bunny bum sugar cookies** are a delightful and safe treat for everyone, including those on an AIP diet, making your Easter celebration inclusive and joyous.
Can You Make These Bunny Bum Sugar Cookies Ahead of Time? Do They Freeze Well?
Absolutely! Planning ahead is a fantastic way to reduce stress during busy holiday preparations, and these **gluten-free Easter cookies** are perfect for it. You can definitely prepare these charming treats in advance, allowing you more time to enjoy your Easter festivities without last-minute baking rushes.
Making Ahead: If you plan to make them a day or two before serving, simply store the decorated cookies in an airtight container at room temperature for up to 2 days, or in the refrigerator for up to 4-5 days. The frosting will firm up in the fridge, making them easy to stack (with parchment paper between layers) without smudging the decorations.
Freezing for Longer Storage: These cookies also freeze remarkably well, making them an excellent option for longer-term storage. To freeze, arrange the fully decorated and set cookies in a single layer on a baking sheet and flash freeze them for about an hour, or until solid. Once solid, transfer the cookies to an airtight freezer-safe container. You can stack them with parchment paper in between layers to prevent sticking. They will keep beautifully in the freezer for up to 1-2 months.
Thawing and Serving: When you’re ready to enjoy them, simply transfer the frozen cookies from the freezer to the refrigerator overnight, or let them come to room temperature on the counter for about 1-2 hours. Ensure they reach room temperature before serving, as this will allow the cookies to soften and the flavors to fully develop, providing the best possible eating experience. This make-ahead and freeze-ahead flexibility ensures you can always have a festive and delicious treat on hand!
Frequently Asked Questions About Bunny Bum Sugar Cookies
Here are some common questions to help you master these adorable **Easter bunny cookies**:
Q: Can I use a different flour blend if I don’t have tigernut flour?
A: While the tigernut flour and tapioca starch blend is optimized for this recipe’s texture and flavor, some gluten-free all-purpose blends might work. However, results may vary significantly in texture and moisture. We recommend sticking to the specified flours or using the Legit Bread Company mix for best results. If experimenting, a blend designed for cutout cookies would be your best bet, but be prepared to adjust liquid amounts.
Q: My dough is too crumbly/too sticky, what should I do?
A: Gluten-free dough can be a bit tricky! If it’s too crumbly, add a very small amount (1/2 to 1 teaspoon) of maple syrup or a dairy-free milk alternative until it comes together. If it’s too sticky, dust with a little extra tapioca starch or tigernut flour until it’s pliable. Chilling the dough for 15-30 minutes can also help with stickiness and makes it easier to roll.
Q: How can I ensure my cookies don’t spread too much?
A: Ensure your palm shortening is firm, not melted or too soft. Also, chilling the cutout cookies on the baking sheet for 10-15 minutes before baking can help them hold their shape. Make sure your oven temperature is accurate, as an oven that’s too low can cause spreading.
Q: What if I can’t find Unreal Candy Gems?
A: For the pink footpads, you can use naturally colored sprinkles, small pieces of freeze-dried fruit (like raspberries), or even a tiny dot of naturally colored frosting. For AIP, freeze-dried fruit is the preferred choice.
Q: Are these cookies truly nut-free?
A: Yes, this recipe uses tigernut flour, which is a tuber, not a tree nut, making these cookies suitable for individuals with nut allergies. Always double-check labels of any purchased ingredients (like chocolate chips or candy gems) to ensure they are processed in a nut-free facility if severe allergies are a concern.
Q: How long do these cookies last once decorated?
A: Stored in an airtight container, the decorated cookies will last at room temperature for up to 2 days, or in the refrigerator for up to 4-5 days. For optimal freshness and texture, consuming them within 2-3 days is recommended.
Q: Can I use different natural sweeteners?
A: Maple syrup and honey are excellent choices. Other liquid sweeteners like agave nectar might alter the texture slightly and are not AIP-friendly. Granulated sweeteners are not recommended for this recipe as they will significantly change the dough consistency.
We hope these FAQs help you in your baking adventure! Don’t hesitate to get creative and personalize your **healthy Easter desserts**.
More Delightful Allergen-Friendly Cookie Recipes You’ll Love
If you enjoyed making these **gluten-free and dairy-free bunny bum sugar cookies**, you’re in for a treat! Here are a few more fantastic recipes from our collection that cater to similar dietary needs, perfect for expanding your repertoire of **healthy Easter treats** and everyday delights:
- Lemon Bar Thumbprint Cookies: Bursting with zesty lemon flavor and a delightful texture, these thumbprint cookies are a bright and refreshing option. They’re a wonderful choice for spring gatherings or whenever you crave a sweet-tart treat.
- Strawberry Lemon Sugar Cookie Bars: Easy to make and incredibly satisfying, these bars combine the classic comfort of sugar cookies with the vibrant flavors of strawberry and lemon. They’re perfect for sharing and a real crowd-pleaser.
- Sugar Cookie Fruit Pizza: A beautiful and delicious dessert that’s as fun to decorate as it is to eat. A soft sugar cookie crust topped with creamy frosting and an array of fresh, colorful fruits makes for an impressive and lighter dessert option, ideal for any celebration.
Explore these recipes and discover more delicious ways to enjoy allergen-friendly baking without compromising on taste or enjoyment!
Bunny Bum Sugar Cookies (Gluten-free, Dairy-free, AIP Friendly)
Leave a Review
Pin Recipe
Want to save this for later?
Just drop your name and email below. Then we’ll email right to your inbox. ✉️
Ingredients
For the cookies
- ¾ cup tapioca starch
- ½ cup tigernut flour
- 1 tbsp gelatin powder
- ½ tsp baking soda
- ¼ cup maple syrup
- ⅓ cup palm shortening
- ½ tsp vanilla extract
For the frosting (sub Simple Mills Frosting if tolerated)
- ⅓ cup palm shortening
- 2 tbsp light-colored honey
- 1 tbsp arrowroot starch
For the decor
- 12 Pink Unreal Candy Gems
- 36 Mini Dairy Free Chocolate Chips
- 6 Mini marshmallows
Instructions
For the cookies
-
Preheat the oven to 350 F (175 C) and line a baking sheet with parchment paper. Lightly grease with coconut oil or other preferred fat. Set aside.
-
Using a large mixing bowl, combine the tapioca starch, tigernut flour, gelatin powder, and baking soda. In a separate bowl, cream together the palm shortening and maple syrup until light and fluffy. Add this mixture into the dry flour mixture and stir in the vanilla extract until all ingredients are combined and a cohesive dough is formed.
-
Transfer the dough to a pastry board or between two sheets of parchment paper. Use a rolling pin to flatten the dough to about 1/4″ thick. Use a larger round cookie cutter (or a glass) to make 6 larger cookies and a small cookie cutter (or a teaspoon measure as a guide) to cut 12 smaller round cookies to make the bunny feet. Carefully transfer the formed cookie dough onto the prepared baking sheet.
-
Evenly space the cookies on the baking sheet and bake in the preheated oven for 12-15 minutes or until the cookies are lightly golden brown around the edges.
-
Transfer to a cooling rack and allow to cool completely before decorating. This prevents the frosting from melting.
For the frosting & decorating
-
Combine the palm shortening, light-colored honey, and arrowroot starch for the frosting in a mixing bowl. Beat until thoroughly incorporated, smooth, and fluffy.
-
Frost each large cookie with a thin layer of the prepared frosting. Press two small cookies onto the bottom of each large cookie to form the bunny feet.
-
Decorate the cookies by placing a mini marshmallow in the center of the large cookie for the tail. Add two pink candy gems to the center of each smaller cookie (bunny feet) for the footpads, and three mini chocolate chips at the lower bottom of each smaller cookie to create the toes. Repeat with all cookies.
-
Allow the decorated cookies to set in the fridge for 10-20 minutes before serving. Serve chilled for best results.
Notes
- Use the frosting recipe as written.
- For the marshmallows (tail), use Sweet Apricity Marshmallows or other AIP-compliant marshmallows.
- Use freeze-dried fruit (e.g., crushed raspberries) for the decoration on the feet instead of candy gems and chocolate chips.
All nutritional information provided is an estimation and will vary based on specific ingredients and brands used.